Cook's Hideout: 2006

December 31, 2006

Red Lentil & Coconut Soup

This month's JFI is hosted by lovely Ashwini at Food for Thought and has thought of a very interesting ingredient - Coconut. To be honest, I don't use a lot of fresh coconut in my cooking. This is mainly because of lack of coconut breaking skills or special gadgets. I remember the very first time I bought a coconut, we went into a corner in our apartment parking lot for an undisturbed breaking ritual. For some reason, I feel all the surfaces in my apartment are too fragile for breaking the big nut.

I use grated coconut in most of the dishes and for recipes that call for fresh coconut, I usually soak the same in small amount of warm water for about 15-20 minutes. This soaked coconut tastes almost fresh.

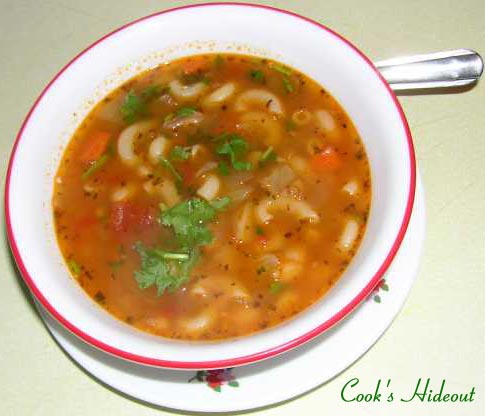
My entry for this month's Jihva for Ingredients is a Spiced Red Lentil and Coconut Soup. This recipe is from my "The Greatest ever Vegetarian Cookbook", edited by Nicola Graimes. This soup is very hearty and a meal in itself (with chunks of warmed naan bread or thick slices of toast).
Ingredients:
  • Red Onions - 2, finely chopped
  • Jalapeño chili - 1, seeded and finely sliced
  • Garlic cloves - 2, chopped
  • Lemon grass - 1" piece, finely sliced
  • Red Lentils - 1 cup, rinsed
  • Ground Coriander - 1 tsp
  • Paprika - 1 tsp
  • Coconut milk - 1 16 oz. can
  • Lime - 1
  • Spring onions - 3, chopped
  • Cilantro - 1 cup, finely chopped
  • Salt and Pepper - to taste
Method:
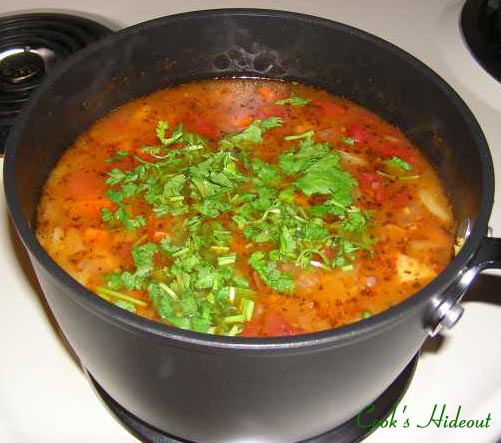
  • Heat 2 tbsp oil in a large pan and add the onions, chili, garlic and lemon grass. Cook for 5 minutes or until the onions have softened, stirring occasionally.
  • Add the lentils and spices. Pour in the coconut milk and 900ml (3 3/4 cups) water, and stir. Bring to the boil, stir, then reduce the heat and simmer for 20-25 minutes or until the lentils are soft and mushy.
  • Pour in the lime juice and add the spring onions and fresh coriander, reserving a little of each for the garnish. Season, then ladle into bowls. Garnish with the reserved spring onions and coriander.
This recipe is adapted from The Greatest Ever Vegetarian Cookbook, Edited by Nicola Graimes.

December 27, 2006

Onion-Green Pepper Sambar

I googled the word “Sambar” and was really surprised to see the number of results displayed (around 75,000 of them). I knew sambar is a very versatile dish, but I didn’t realize that each household in south India have their own way of making it. When you think of sambar, you think of (idlis, of course.. but that’s not what I’m thinking here J) spicy lentil-tamarind based soup with veggies. But the different ways in which all these ingredients come together, gives rise to a plethora of sambar recipes.
Doesn't that book look wicked?? This is the book that I carried with me to write down recipes from my mom, my mother-in-law and the TV (there are like 4 different cooking shows on 4 different telugu channels in the span of 2 hours in India and I made sure that I didn’t miss out anything interesting on any of the shows). I have some authentic Andhra dishes and some fancy (can I use that word for food???) dishes in the book that I have to try. Will post about them soon.

For now, here is my mom’s way of making sambar. I used potatoes, green peppers and onions for this.

Ingredients:
Toor dal – 1 cup
Onions – 1 large, thinly sliced
Green pepper – 1 medium, sliced thin
Potatoes – 2 medium, sliced thin
Tomatoes – 2 medium, chopped fine
Tamarind paste – 2 tbsp
Salt – to taste

For Sambar paste:
Chana dal – 2 tbsp
Urad dal – 2 tbsp
Red chilies – 6
Coriander seeds – 1 tsp
Cumin seeds – 1 tsp
Pepper cloves – ½ tsp
Fenugreek seeds - 1/4 tsp
Grated coconut (fresh or dry) – 4 tbsp

For Tadka:
Mustard Seeds - 1 tsp
Cumin Seeds - 1 tsp
Curry leaves - 6

Rice with Goruchikkudukaya kura, Sambar, Gongura pachadi & onions

Method:

  • To make the paste, fry all ingredients except for coconut in 1 tsp ghee. Cool and grind into a smooth paste along with grated coconut. Keep aside.
  • Pressure cook dal until very very smooth (I usually wait for atleast half a dozen whistles in my cooker). Boil the veggies in just enough water till tender.
  • Add chopped tomatoes, cover and cook tomatoes turn mushy.
  • Add the cooked dal (mash it a little bit for smoother texture), tamarind paste, ground paste, salt and 2 cups of water.
  • Bring it to a slow simmer and cook till you get the desired consistency. Add water if you like your sambar on the liquidy side.
  • Heat 1 tsp oil in a small pan, add cumin seeds, mustard seeds and curry leaves. After the seeds splutter add it to sambar. Mix well.
I always end up making a whole big pot of sambar that lasts for atleast 3-4 meals and I don’t mind that because the taste just keeps getting better the next day. Enjoy with idli or rice.
Check out Sailu's, Trupti's, Mythreyee's, Revathi's and Indira's sambar recipes.

December 25, 2006

Merry Christmas with Andhra Cake

Wish you all a very Happy Christmas.

I made Chocolate chip cookies, Pound cake and a special Andhra Cake (its not baked, but rather cooked cake) for Christmas this year.
This is the newest help that I bought from India this time. Its a multi-function table-top grinder (Ultra pride+). Making idlis and dosas is going to be a jiffy now (its just going to more convenient than regular blender).

My Ammamma used to make big fluffy Dibba rottes (literally translated into "Fat bread") in a round brass utensil (ittadi ginne). It resembles a cake in both shape and texture and hence the name Andhra cake.
Th cake is basically made with fresh idli batter which is not fermented.

Ingredients:
Urad dal (minapappu) - 1 cup
Idli rawa - 2 cups
Jeera - 1 tsp
Salt - to taste
Method:
  • Soak urad dal and idli rawa (separately) for 4-5 hours.
  • Grind urad dal into smooth batter by adding little water. Add pre-soaked idli rawa to the batter and mix well. Add jeera to the batter and mix well.
  • In a deep (either round or flat bottom) pan, heat 2 tsp oil on medium heat, add about 2 cups (or more depending on the size of your pan) of batter. Place a small steel plate or spoon in the batter, so that the inside gets cooked evenly. Cover and cook for about 15 minutes or until the rotte comes out without sticking to the bottom.
  • Turn the rotte over and cook on the other side for another 7-10 minutes.
  • Remove from the pan, cut into wedges and serve with chutney, sambhar or pachadi.

December 21, 2006

Sorakaya Kura

Personally sorakaya (bottle gourd, lauki) is not a very exciting veggie. It doesn’t fall into the category of kid’s favorite’s alu (potato) or bendakaya (okra), but rather sits along with broccoli and brussel sprouts. I remember, as a kid, eating sorakaraya kura with the least interest and telling my mom not to cook it anymore. But now, after all the years of not liking sorakaya, I started experimenting and using it more than I could imagine 10 years ago.

A little research on bottle gourd told me that is not an important source of any nutrient. The composition of 100 grams of young bottle gourd includes 20 mg calcium and 6 mg of Vitamin C. It is low is saturated fat and cholesterol and high in dietary fiber, riboflavin, zinc, thiamin, iron, magnesium and manganese.

The gourd itself doesn’t have any discernible taste, and the dish is mostly acquired taste from the spices and other ingredients put in it. I used Nagpur garam masala that my mom made (she said it has about 31 or 33 spices in it) and it gave the dish spicy kick.

Ingredients:
Sorakaya (bottle gourd)– 1 medium, peeled and cubed
Onion – 1 small
Tomato puree – 2 tbsp
Green chilies – 3
Besan – 3 tsp
Milk – ¼ cup
Water – 1 cup
Garam masala – 1 tsp
Red chili powder – ½ tsp
Mustard seeds – ½ tsp
Cumin seeds - ½ tsp
Curry leaves – 5
Salt – to taste

Method:
  • Heat 2 tsp oil in a pan, add the seeds and curry leaves, after the seeds splutter, add onions, turmeric and sauté till lightly browned.
  • Add sorakaya pieces and green chilies, cover and cook till tender.
  • When the gourd is tender, add tomato puree and cook for 1 minute.
  • Mix besan with milk into a smooth paste without lumps. Add this to the veggies with water and red chili powder. Cover and cook for 5 minutes on low flame.
  • Add garam masala and salt, cover and cook for another 2 minutes.
You might have noticed that I have started adding milk in all the dishes. The reason being, my husband doesn’t like dairy, milk/ yogurt/ buttermilk, products that are white and have a distinct milk taste. So I’m sneaking in milk into everything, so he (we) would get the necessary nutrients and calcium. Good idea.. right??

December 14, 2006

Methi-Soya Chunk Masala

I’m back from my short and sweet India trip. Had a great time with the family, great home food, good long chats, quick shopping and bam.. I was on my flight back. I was a little sick when I started in India and was totally sick after getting here (I guess home sickness and the cold weather hit right in my face). I’m slowly getting back to routine cooking and blog hopping.
I had planned on participating in JFI-Jaggery and I had my mom cook Chalimidi with jaggery, but due to technical difficulties I couldn’t post anything from India. I’m going to post it sometime soon.
Getting back to the dish in question, Methi-Soya Chunks masala, I remembered seeing a dish with methi leaves and soya chunks on one of the food blogs, but I completely forgot which one and couldn’t find it again. I just went with my instincts here and it turned out pretty good. This would go well with Jeera rice or chapathis.

Ingredients:
Methi leaves – 1 big bunch
Mini soya chunks- ½ cup (boiled per package directions)
Onion – 1 big
Tomato – 2 ripe
Green chilies – 2
Milk – ¼ cup
Corn flour – 1 tsp (mix with little water to form a smooth paste)
Red chili powder – 1 tsp
Turmeric – pinch
Cumin powder – 1 tsp
Cumin seeds (jeera) – ½ tsp
Salt – to taste
Method:
  • Heat 1 tsp of oil in a pan, add jeera and let the seeds splutter. Fry onions till they turn light brown.
  • Add tomatoes and cook covered till done.
  • Add methi leaves, turmeric, cumin powder and red chili powder. Cover and cook till the leaves wilt, about 5 minutes.
  • Mean while dry fry the boiled soya chunks (optional). I just like the texture of fried chunks.
  • After the leaves are wilted, add the milk and bring it to a slow simmer. Add the fried chunks and salt, cook for 3-5 minutes. Add corn flour mixture and cook for 1 minute or until the gravy thickens. Serve with rice or chapathi.

November 14, 2006

Blogging Break

Guys.. I'm off to India for a short vacation (good things don't last long.. I wish they do.. but.. you know..) Will be back in 2 weeks.. I'm planning to participate in JFI-Jaggery from India (with my mom's help).
Have a very Happy Thanksgiving.. Have fun..

PS: I was wondering what Indians would make if we were to celebrate Thanksgiving?? Will think about this on my way to India..

November 11, 2006

WBB# 7-Meatless Sausage Bake

Theme for this month's Weekend Breakfast Blogging# 7 (Brain child of Nandita of Saffron trail) is baking. Good thing is she did not limit it to just muffins and breakfast breads, event is open for savory and spicy bakes too. Here is my savory, but not so spicy Breakfast bake, that does not pack on too many pounds.
I saw the recipe in one of the old Reader's digest magazine and I happen to have all the ingredients on hand. Its quite filling and can be a perfect brunch item paired with a salad. The dish can be prepped the night before like sauteing the peppers and leaving frozen hash browns and patties in the fridge to thaw. Assemble the dish by mixing all the ingredients together and baking it in the morning for breakfast.
Frozen Hash Brown and Sausage Patties (thawing)

Ingredients:

Red pepper - 1 medium, chopped
Green pepper - 1 medium, chopped
Onion - 1 medium, chopped
Hash browns - 2 frozen patties (or grated potato), thawed and crumbled
Meatless Sausage patties - 4 frozen, thawed and crumble
Cheddar Cheese (reduced fat) - 1/2 cup
Eggs - 3
Egg whites - 3
Milk - 1/2 cup (low-fat or non-fat)
Garlic powder - 1/2 tsp
Salt and Pepper - to taste


Method:
  • Preheat oven to 375 F.
  • Heat 1 tbsp of olive oil in a pan; saute peppers and onions till tender, about 7-10 minutes. Season with garlic powder, salt and pepper and keep aside.
  • In a large bowl, whisk in the eggs, milk, cheese, crumbled patties and hash browns & onion mixture. Season with salt and pepper.
  • Transfer the mixture into a pie pan or baking dish and bake 30-35 minutes or until a knife inserted in the center comes out clean.
Breakfast bake with Toast

November 09, 2006

Veggie Pizza

Who doesn’t like Pizzas?? But my problem with store-bought pizzas is the amount of oil in the crust and the toppings (especially Costco pizza, you need about 5 paper towels to soak up oil in the topping). To eat more healthful, I started making pizzas at home, with store-bought crust (pizza base). These bases are fairly inexpensive (not more than $2 for one base) and all you have to do is top it and bake it.
I found this recipe online and it is very unique from any store-bought pizza. I had all the ingredients on hand. The pizza turned out to be yummy and with so many veggies.. it was guilt-free also.

Ingredients:
Pizza crust – 1 (Store-bought or home-made)
Black beans – 1 cup (about ½ a 16 oz. can, drained and rinsed)
Carrots – 2/3 cup grated (2 medium)
Onion – 1 medium, thinly sliced
Zucchini – 1 medium, thinly sliced
Red pepper flakes – ¼ tsp
Part skim Mozzarella cheese (or reduced fat Italian cheese blend) – 2/3 cup

For the Sauce:
Sun-dried Tomatoes – 8 (oil-packed or dried)
Tomato paste – 1 tbsp
Tomato – 1 medium, peeled and chopped
Hot sauce – 1 tbsp (or to taste)
Salt and Pepper (to taste)

Method:
  • To make the sauce: Place sun-dried tomatoes in a bowl and cover with boiling water; let stand 15 minutes; drain and chop (skip this step if using oil-packed tomatoes). Grind sun-dried tomatoes, tomato paste, chopped tomato, hot sauce, salt and pepper into a smooth paste. You can add water or olive oil to thin out the sauce. I did not add water and my sauce was thicker than regular marinara sauce.
  • To make the pizza: Pre-heat oven to 425ºF (220ºC). Place the crust on a baking sheet and spread with the tomato sauce.
  • Top with beans and carrots.
  • Heat 1 tbsp olive oil in a pan, sauté onions, zucchini and red pepper flakes for 5 minutes or until the veggies are tender. Arrange on the crust, sprinkle with cheese.
  • Bake 12-15 minutes or until the cheese is melted and bubbly.
We had our pizza with green salad (I tossed in the left over beans, carrots with salad greens and pesto dressing). This is my entry to this week's ARF 5-A-Tuesday hosted by lovely Cate at Sweet nicks.

November 07, 2006

Pasta-e-Fagioli (Pasta and Bean Soup)

I love soups because 1. You can play around with the ingredients (use all those remaining lonely veggies) 2. Can be made in one pot (easy clean up) 3. They don’t need a lot of fat and are highly nutritious 4. They are super comforting on cold winter nights (just like now).

This recipe is from Vegetarian times magazine and it tastes great and is very filling. The recipe uses fennel bulb (not used traditionally in pasta-e-fagioli) which makes the soup sweet and licoricey.

Ingredients:
Onion – 1 medium, chopped
Celery – 2 stalks, chopped
Carrots – 2 medium, chopped
Fennel bulb – 1 medium size, chopped
Garlic – 2 cloves
Chopped Tomatoes – 1 28 oz. can
Cannelini beans - 1 15oz. can, drained and rinsed
Small Pasta (Orzo, ditoli or elbow macaroni) – 8oz.
Bay leaves – 2
Red pepper flakes - 1/4 tsp
Low-sodium vegetable broth – 4 cups
Dried Oregano – 1 tsp
Salt and Pepper – to taste
Method:
  • Heat 1 tbsp olive oil over medium-high heat in a large pot. Add fennel, onion and celery, and sauté 7 minutes, or until the vegetables are softened.
  • Add, oregano and pepper flakes, and cook for 1 minute more.
  • Stir in tomatoes and beans, and simmer 10 minutes over medium-high heat.
  • Add broth, salt and 21/2 cups water, and cook for 20 minutes, stirring occasionally.
  • Stir in pasta, and cook 10 minutes more or until pasta is tender.
  • Sprinkle with parsley, and season with salt and pepper.

November 04, 2006

Spotlight on: Baking: From my Kitchen to Yours

Sara of Weekend Cookbook Challenge is hosting an event to promote a new cookbook; Baking: From My Home to Yours by Dorie Greenspan (published by Houghton Mifflin Company). Sara asked me to take part in this event and I can’t thank Sara enough for that.
I received a complimentary copy of the book by Dorie Greenspan from the publishers and as per Sara’s instructions I had to pick one or two recipes from the book, bake them and blog about them. Some of the pictures in the book (including the one on the cover) are quite intimidating for a novice baker like me, but Dorie’s clear and detailed instructions make baking these recipes a cakewalk. As I read the recipes, I felt Dorie's presence in my kitchen helping me through each of the recipe. Also all the recipes have additional information on serving, make ahead, storing and playing around tips.
Trying to decide which recipe to try first was a challenge and after leafing through the book for almost 20 times, I narrowed down my search to two. My husband being a chocoholic, my two choices were the Black-and-White chocolate cake and the Gooey Chocolate cakes. I ended up making the gooey chocolate cake and I can’t tell you how good they turned out and how my family was just raving about them for 2 days.
When I first tasted this cake about 3 years ago in Chilis (Molten chocolate cake on their dessert menu), I never thought I can make it at home. But this recipe can be made at home with foolproof results, even if you're not a star baker like me.
This recipe makes 6 small cakes and you will need 6 ramekins of same size, which even the author agrees is not possible. So the tip she gives is to use disposable foil muffin pans (that come 2 per pack) and they work great (you can wash and reuse them).

Ingredients:
All-purpose flour – 1/3 cup
Unsweetened Cocoa powder – 3 tbsp
Salt – ¼ tsp
Bittersweet chocolate – 5 ounces, (4 oz. coarsely chopped and 1 oz. finely chopped)
Butter – 1 stick, cut into 8 pieces
Eggs – 2 large eggs and 1 large yolk at room temperature
Sugar – 6 tbsp

Method:
  • Center the rack in the oven and preheat the oven to 400ºF.
  • Butter (or spray)6 cups of regular-size muffin pans (or the disposable aluminum foil pan), dust the insides with flour, tap out the excess. Put the muffin pan on a baking sheet.
  • Sift flour, cocoa and salt together.
  • Set a heat proof bowl over a sauce of gently simmering water, put the coarsely chopped chocolate and the butter in the bowl, stir occasionally over the simmering water just until they are melted. Remove the bowl from the pan of water.
  • Whisk eggs and the yolk in a large bowl until homogeneous. Add sugar and whisk until well blended, about 2 minutes.
  • Add the dry ingredients and still using the whisk, stir (don't beat) them into the eggs. Little-by-little, and using a light hand, stir in the melted chocolate and butter.
  • Divide the batter evenly among the muffin cups and sprinkle the finely chopped chocolate over the batter.
  • Bake the cakes for 13 minutes. Transfer them, still on the baking sheet, to a rack to cool.
  • Unmold the cakes onto a silicon lined cutting board and serve warm.
Dorie suggests serving these cakes with something that plays off their warm, gooey, chocolaty interior (like ice cream/ creme angliase). We just loved them as is, right out of the oven. (Will play around next time :-)
Though these cakes are meant to eat warm and runny, any remaining cakes can be wrapped in a plastic wrap (after completely cooled) at room temperature. The next day the texture of the center of the cake will remind you of ganache. I strongly recommend doubling the recipe, so that people don't complain that they didn't enough of it.
I look forward to baking more of the recipes for the upcoming festive season.

November 01, 2006

Kofta Curry

This is my take on the rich, creamy and delicious Malai kofta. I didn’t want to deep fry the koftas and I used Giniann’s tip on baking the koftas. I used my toaster to bake the koftas, but they didn’t turn as brown I would like them to be, so I shallow fried them in little bit of oil to make them crispy and golden outside and creamy inside. Even though I ended up using more oil than I thought of using, it is way too less than the malai kofta’s from the neighborhood restaurant. Here’s the recipe.

Ingredients:
For Koftas:
Potatoes – 2 medium, boiled, peeled and mashed
Grated Paneer - 1/4 cup
Corn flour – 2 tbsp
Red chili powder – 1 tsp
Garam masala – 1 tsp
Cumin powder – ½ tsp
Salt – to taste

For Gravy:
Onion – 1 medium, chopped
Tomato paste - 3 tbsp
Garlic - 2 cloves
Ginger - 1"piece
Garam masala – 1 tsp
Red chili powder – 1 tsp
Cumin powder – ½ tsp
Coriander powder – ½ tsp
Turmeric - 1/4 tsp
Light cream – ¼ cup
Salt – to taste
Method:
  • To make the koftas, mash all the ingredients together and make small uniform balls. You can either deep fry them or bake them in a 400ºF oven for 30 minutes. If they don’t turn as golden as you like, sauté them in 2 tbsp of oil and drain them on a paper towel.
  • Grind half of the chopped onion, garlic and ginger into a paste.
  • Saute the other half of the chopped onion in the oil, after they turn transparent, add the onion paste, turmeric and 1/2 cup water. Cook on medium heat for 5 minutes.
  • Add tomato paste, cumin and coriander powder, red chili powder and cook for another 10 minutes. Add water if the gravy looks too dry.
  • Add the cream, salt and koftas and simmer for a little while till the koftas are warmed through.
  • Garnish with cilantro and serve with plain or jeera rice or chapathis.

October 30, 2006

Palakura Pulusu (Spinach Soup)

I have been thinking of this recipe for quite a while now. With the scare on bagged spinach, I thought its better to be safe than sorry and didn’t buy spinach for almost 2 months. I bought a bunch from Indian store last weekend.
Palakura Pulusu

Palakura Pulusu
This is my grandmother (Dad’s mom) recipe and I had to call my mom for the exact ingredients and method. It is a very earthy, nutritious and low-fat dish.

Ingredients:
Spinach – 1 bunch, washed and chopped
Red onion – 1 medium, chopped
Green chilies – 4, chopped
Tamarind pulp – 2 tbsp
Rice flour – 2 tbsp
Salt – to taste
For tempering (Tadka):
Mustard seeds – 1 tsp
Cumin seeds – 1 tsp
Fenugreek seeds (Menthulu) – ½ tsp
Dry red chilies – 2
Curry leaves – 4-5
Asafetida – a pinch

Method:
  • Take spinach and onions with 1 cup of water in a saucepan; cover and cook on medium heat for about 5 minutes.
  • Add green chilies, salt and tamarind juice (add ¼ cup water to tamarind pulp to make the juice); cook for 10minutes.
  • In the mean time, mix the flour with ¼ cup water to make slurry with no lumps. Add this to the spinach mixture and cook for another 5 minutes till the mixture is slightly thickened.
  • Remove from heat and add the tadka or tempering. For tempering, heat 1 tsp oil in a small saucepan, add all the ingredients listed, let the seeds splutter. Add this to the spinach mixture. Serve with rice.
Palakura Pulusu

Pictures updated: June 2013

October 27, 2006

Tempeh Jambalaya

I get very excited when I go grocery shopping especially if its specialty store (My husband says I go into a trance when I start shopping.. hehehe). A month ago, we shopped at Whole Foods store and I was really awed by the array of organic products (including fresh veggies, fruits, packaged & frozen food) that they carry. I have to say prices are not cheap and I wouldn’t probably go there every week, but may be once a month for some special products (that are not available in regular grocery stores).
I ended up buying a lot of stuff which also included a package of tempeh*. After looking for recipes online and in my cookbooks, I came up with this Jambalaya** recipe.

Uncooked Tempeh(Photos Courtesy: wikipedia.org)

*Tempeh is a fermented whole soybean product. Tempeh’s fermentation process and its retention of the whole bean give it a higher protein, dietary fiber and vitamins content compared to tofu, as well as firmer texture and stronger flavor.

**Jambalaya is a Louisiana Cajun or Creole dish. It is traditionally a one pot dish made with meats, vegetables and rice.

Ingredients:
Tempeh – 8 oz. package
Celery – 2 stalks, chopped
Carrots – 2 medium, chopped
Peppers (any color, I used red, yellow and orange) – 1 cup chopped
Zucchini – 1 medium, chopped
Onion – 1 medium, chopped
Garlic – 3 cloves
Chopped tomatoes – 16 oz. can
Vegetable Broth (low-sodium) – 2 ½ cups (or 1 vegetable bouillon cube)
Long grain rice – 1 cup
Salt and Pepper – to taste

Seasoning blend:
Cayenne pepper – 1 tsp
Paprika – 1 tsp
Pepper – ½ tsp
Dried thyme – ½ tsp
Dried Oregano – ½ tsp
Salt – ½ tsp

Method:
  • Mix all the ingredients for the seasoning blend in a small bowl and keep aside. Make sure that all the veggies are chopped approximately the same size, so they cook uniformly.
  • Cut tempeh into 1” pieces and fry them in 1 tsp of olive oil till lightly browned on all sides. Remove and keep aside.
  • Heat 2 tbsp of olive oil in a heavy bottom pan***, add onions, garlic, celery, carrots, peppers and sauté for about 5 minutes or until they start to get slightly tender.
  • Add zucchini and sauté for another 5 minutes.
  • Add tomatoes, rice, sautéed tempeh, seasoning, vegetable broth (or water) and salt. Bring the mixture to a boil, lower the heat and simmer covered till rice is cooked, about 10-15 minutes.
  • Remove from heat, leave covered for another 10 minutes, fluff with fork, garnish with green onions and serve with a dollop of sour cream.
*** I used Pressure Cooker and it about me 20 minutes to cook, excluding, of course, prepping time.

This is my entry for this week's Sweet Nicks ARF 5-A-Day Tuesday.

October 26, 2006

Pachi Pulusu

This is a quick and easy recipe from my mother-in-law. As the name suggests (Pachi=raw; pulusu=soup), there is very little cooking involved in this dish. It tastes awesome with vuthi pappu (plain dal).

Ingredients:
Tamarind paste - 2 tbsp
Onion - 1 medium, chopped fine
Green chilies - 4, chopped fine
Sesame seeds - 1 tbsp
Sugar - 1 tsp
Salt - to taste

For tempering:
Mustard seeds - 1 tsp
Cumin seeds - 1tsp
Curry leaves - 6

Method:
  • Dry roast sesame seeds and grind into powder.
  • Add water to tamarind paste and bring to a consistency of your liking. Add chopped onions, green chilies, sugar, salt and sesame seeds powder. Mix well (you might want to use your hand to get uniform consistency).
  • Heat 1 tsp oil in a pan, add the seeds and curry leaves. Add this to the pulusu and serve with rice and dal.

October 23, 2006

Curry leaves Rice (Karivepaku Annam)

Whether you fry curry leaves (Karuveppilai, Kari Bevu, Karri Patta, Karivepaku) in oil or ghee they give out this distinct flavor that’s just delicious. Curry leaves give an oomph factor to many Indian dishes like pulihora (tamarind rice), dals and some curries.
We had a huge curry tree in the backyard of our house we used to live years ago. Fresh karipatta everyday right from the tree. Now I spend about $1 for a small bag with about 6-7 lean stems.
I wanted to make Meena’s Eggs in curry leaf gravy and bought two bags of them last week. But didn’t realize I was out of eggs (duh..) Instead I made this rice dish that’s just simply delicious that’s perfect as a quick weeknight dinner. Recipe is from an old telugu newspaper.

Ingredients:
Rice – 1 cup cooked
Curry leaves – about 4 handfuls
Onion – 1 large
Green chilies – 4
Garlic – 3 cloves
Lemon juice – 1 tbsp
Cumin seeds (jeera) – 1 tsp
Salt – to taste
Method:
  • Wash the curry leaves and grind them into a paste with as little water as possible.
  • Heat 2 tbsp oil in a pan, add jeera and fry for 30 seconds. Add chopped onions, green chilies, garlic and curry leaf paste, sauté till onions are soft, about 7-8 minutes.
  • Add cooked rice to the mixture along with lemon juice and salt. Mix well and serve as is or with any curry or chips.

October 21, 2006

7 Cup Sweet

Diwali is so much fun with lots of food and firecrackers. I miss the firecrackers part in U.S, but to compensate that I made this really sweet treat.
7 cup sweet tastes similar to Mysore Pak, but it is way easy to make. As the name suggests it has 7 cups (a cup could be any measure) of ingredients and that’s it, cook them all together to make this delicious treat. You can also make 5 cup sweet, by omitting 1 cup sugar and 1 cup coconut.
7 Cup Sweet
Updated Pic from April 2013

Ingredients:
Besan (Chickpea flour) – 1 cup
Sugar – 3 cups
Grated Coconut – 1 cup
Milk – 1 cup
Ghee (or unsweetened butter) – 1 cup
Method:
  • Combine all the ingredients together in a heavy bottom pan on medium low flame.
  • Cook stirring occasionally for about 20-25 minutes or until the mixture starts to get frothy. At this stage, you have to be hovering around the stove more often, stirring. Keep stirring frequently for another 15-20 minutes.
  • After a while, the whole mixture starts to pull away from the bottom of the pan and starts moving with the spoon. Remove onto a greased plate at this point and allow to cool.
  • Score into squares or diamonds when slightly warm and enjoy the melt in your mouth taste of this simple sweet.

October 20, 2006

Pesara Garelu (Moong dal Vada)

Wish you all a very Happy Deepavali.

Pulihora (tamarind/lemon/mango rice) and garelu (vada) are the most frequently made festival food in our household. I think it’s the same case in most of the South Indian families.
My attempts in making garelu have not been very successful. First attempt failed because of too much water in the batter and I ended up making punukulu (after adding almost a cup of rice flour). Next time, I made sure that I don’t add too much water, but for some strange reason, my garelu were really hard. When I was almost on the verge of giving up my quest for making garelu, I stumbled upon these pesarapappu garelu. This recipe is from an old telugu (Eenadu) newspaper.

Ingredients:
Pesalu (Green moong dal) – 1 cup
Minapappu (Urad dal) – ½ cup
Green chilies – 8
Ginger – 2” piece
Cumin seeds – 1tbsp
Salt – to taste

Method:
  • Soak moong and urad dal, separately, overnight. In the morning, grind them into smooth batter with green chilies, cumin, ginger and salt.
  • Heat about 1½ to 2 cups of oil (I used canola oil) on medium-high flame. When the oil is hot enough, flatten a lemon size batter either on your palm or on a plastic Ziploc bag, make a small hole in the middle, slowly slide the batter into the hot oil. Fry the vadas on medium flame on both sides, till slightly golden brown.
  • Serve hot with any chutney (tomato, coriander, ginger, mint or good old coconut).
This is my entry for VKN's VCC Q3 2006: Festival Food event and this month's JFI: Festival Food hosted by lovely Vee at Past, Present and Me.

October 18, 2006

Guinness Cake

Are you wondering why I have a picture of a beer bottle under Chocolate cake? I used it to make my cake. I was surprised when I saw the recipe (in Vegetarian times) too, but I wanted to try it out and what better occasion than my husband’s birthday. He loves moist chocolate cakes and he wanted me to make a cake with only chocolate and nothing else (no nuts or preserves or frosting). This recipe has ingredients like sour cream and beer that are not generally used to make a cake, but it still fit my husband’s liking with no extra stuff in it.
Very easy to put together, most of the ingredients were in my pantry, except of course the Beer. You need “Stout” like Guinness brand beer.

Ingredients:
Stout – 2/3 cup
Butter – 10 tbsp (1 stick plus 2 tbsp)
All purpose flour – 1 1/3 cups
Sugar – 1 1/3 cups
Cocoa powder (unsweetened) – ½ cup
Baking Soda – 1 tsp
Salt – ½ tsp
Eggs – 1 large plus 1 large yolk
Sour cream – 2/3 cup

Method:
  • Preheat oven to 350ºF. Butter an 8” round pan and line with wax paper or parchment paper.
  • In a heavy bottom saucepan, bring the beer and butter to a simmer on medium flame. Add cocoa and whisk well to incorporate. Remove from heat and cool slightly (about 10 minutes).
  • In the mean time, sift flour, baking soda, salt and sugar in a bowl. Mix well and set aside.
  • In another bowl, beat the egg, yolk and sour cream with electric mixer until well blended. Add the beer + butter mixture to the eggs and beat till incorporated.
  • Add the flour mixture; beat on lowest speed for 30 seconds. Use a rubber spatula and fold the flour till well incorporated.
  • Pour the batter into prepared pan, bake for 50-55 minutes or till the toothpick comes out clean.
  • Cool on wire rack. Cut and serve with ice cream or whipped cream, or just sprinkled with confectioner’s sugar. Enjoy.
I have to tell you, cake does have a slight beery smell to it, but it is so moist that you just want to have one more piece. Yummy..

October 16, 2006

World Bread day: Indian Naan

Bread is the staple food for almost all the countries in the world and it definitely deserves a day on its honor. Zorra of 1x umruehren bitte is hosting a wonderful blog event on World Bread Day and she invited all of us to blog about bread that is home-baked or even bought. My entry to this event is Indian Bread: Naan.
Five years ago in India, white bread was the only bread that I knew. After coming to the U.S. I heard and learnt about the various breads and the list keeps growing everyday (potato and wheat bread were the first ones I tasted). I know that many of these breads are now available in India too (culinary globalization... dont you think).
Growing up, bread was not a part of our every meals (our staple food being rice). My mom used to make Indian breads like chapati, puri or paratha may be once or twice a week and we kids used to consider that a feast (just a welcoming change from having rice everyday). Now, we have bread almost four times a week either for breakfast, lunch or dinner.
I am sending Indian Naan as my entry for World Bread day.

Ingredients:
All-purpose flour - 4 cups
Baking powder - 1tsp
Salt - 1/2 tsp
Active dry-yeast - 1/4 oz. envelope
Sugar - 1tsp
Milk - 2/3 cup, lukewarm
Oil - 2 tbsp
Plain yogurt - 2/3 cup
Egg - 1, beaten (optional)
Method:
  • Sift the flour, baking powder and salt into a mixing bowl. Stir in the yeast and sugar. Make a well in the center. Pour in the milk, oil, yogurt and beaten egg (if using). Beat well, gradually incorporating the surrounding flour to make a dough.
  • Knead the dough on a lightly floured surface for 10 minutes. Place in a lightly oiled bowl, cover with oiled plastic wrap and set in a warm place for about 1 hour, until doubled in bulk.
  • Put a pizza stone on the lowest rack in the oven and preheat the oven to 475°F.
  • Knead the dough lightly again and divide into six pieces. Roll each piece into a tear-drop shape, brush lightly with oil and slap onto the hot pizza stone.
  • Bake the naan for 3 minutes, until puffed up, flip and bake for another 3 minutes. Remove and brush lightly with ghee.
  • Serve hot or warm with a curry.
To get a soft naan, dough needs to be rolled out fairly thick (otherwise it is going to be hard and crispy). You can find more Naan recipes here, here, here and here.

October 11, 2006

Stuffed Zucchini with Sage

Meeta made her monthly mingle more interesting by making “Take Two” as the theme for this month. She wants us to make a dish with Zucchini and Sage.
To be honest, I have never cooked with sage and was always under the impression that it is used only in poultry dishes (Food TV knowledge). I learnt from my research on sage that it is slightly bitter in flavor and highly aromatic and it enhances meats and poultry and is delicious if used discreetly with beans, cheese, lentils and in stuffings. Even after all this research, I wasn’t sure how I was going to make a dish with zucchini AND sage (thought about making soup.. but I wasn’t sure if it has to be tomato base or roux base).
Finally I decided on making stuffed zucchini (inspired by this recipe from Chocolate and Zucchini site). To be on the safe side I stuffed only one zucchini, in case this didn’t turn out too good, I can still make my soup with the back up zucchini. Luckily I didnt have to use my back up.

Ingredients:
Zucchini – 1, cut lengthwise and halved
Quinoa* – ½ cup cooked
Onion – 1 medium, finely chopped
Red bell pepper – 1 small, finely chopped
Sage – 1tbsp (fresh or ½ tbsp dry)
Cheddar cheese/ Pepper Jack cheese – ¼ cup
Salt and Pepper – to taste

Tomato-Sage Sauce:
Tomato paste – 3 tbsp
Onion – 1 small chopped
Sage – 1tsp
Garlic – 1 clove
Salt and Pepper – to taste

Method:
  • Pre-heat the oven to 375ºF.
  • Gently scoop out the flesh of the zucchini with a spoon and roughly chop the flesh. Lightly season hulled zucchini with salt and pepper.
  • Heat 1tbsp of olive oil in a pan; add the onions, red pepper, zucchini and sage. Cook till the veggies soften for about 10 minutes.
  • Add cooked quinoa, salt and pepper; cook for another 5 minutes. Remove from heat and keep aside.
  • In the mean time make the tomato-sage sauce; heat 1tsp olive oil in a sauce pan, add the onions, crushed garlic & sage and sauté till light brown. Add the tomato paste, 1cup of water, salt and pepper and cook for 10 minutes on low flame. Remove from heat and keep aside.
  • Mound the quinoa-sage mixture in zucchini quarters and sprinkle with cheese evenly.
  • Spread 2 tbsp of tomato sauce evenly in a baking pan, arrange the zucchini in a single layer, cover with foil and bake oven for about 15-20 minutes or until zucchini is tender and the cheese melted.
  • Serve warm with more sauce on the top.
So, the good news is I didn’t have to make soup with my other zucchini, but the bad news is I wish I stuffed the other one too.. LOL..
As far as sage is concerned, it has a strong flavor that reminded me of biting into raw turmeric, but it complemented my dish without overpowering it.
Ok then.. let me send this dish to Meeta and I’m dying to see what all of you guys have created with Zucchini AND Sage.

*Quinoa ((pronounced "keen-wa") is a super grain, unlike other grains, quinoa is a complete protein because it contains all eight essential amino acids. It is a excellent source of calcium, potassium and zinc as well as iron, magnesium and B vitamins.
It has a mild, slightly bitter taste and firm texture. Grains quadruple in size after cooking and become translucent with an unusual white outer ring.

Note: You can substitute quinoa with brown rice.

LinkWithin

Related Posts Widget for Blogs by LinkWithin
Blogging tips